Hum Widget Overview
The Hum widget is a turnkey solution for integrating internet service provider discovery and e-commerce functionality into your website or mobile application. With minimal setup, you can provide your users with address-specific internet plans, pricing, and the ability to order service directly.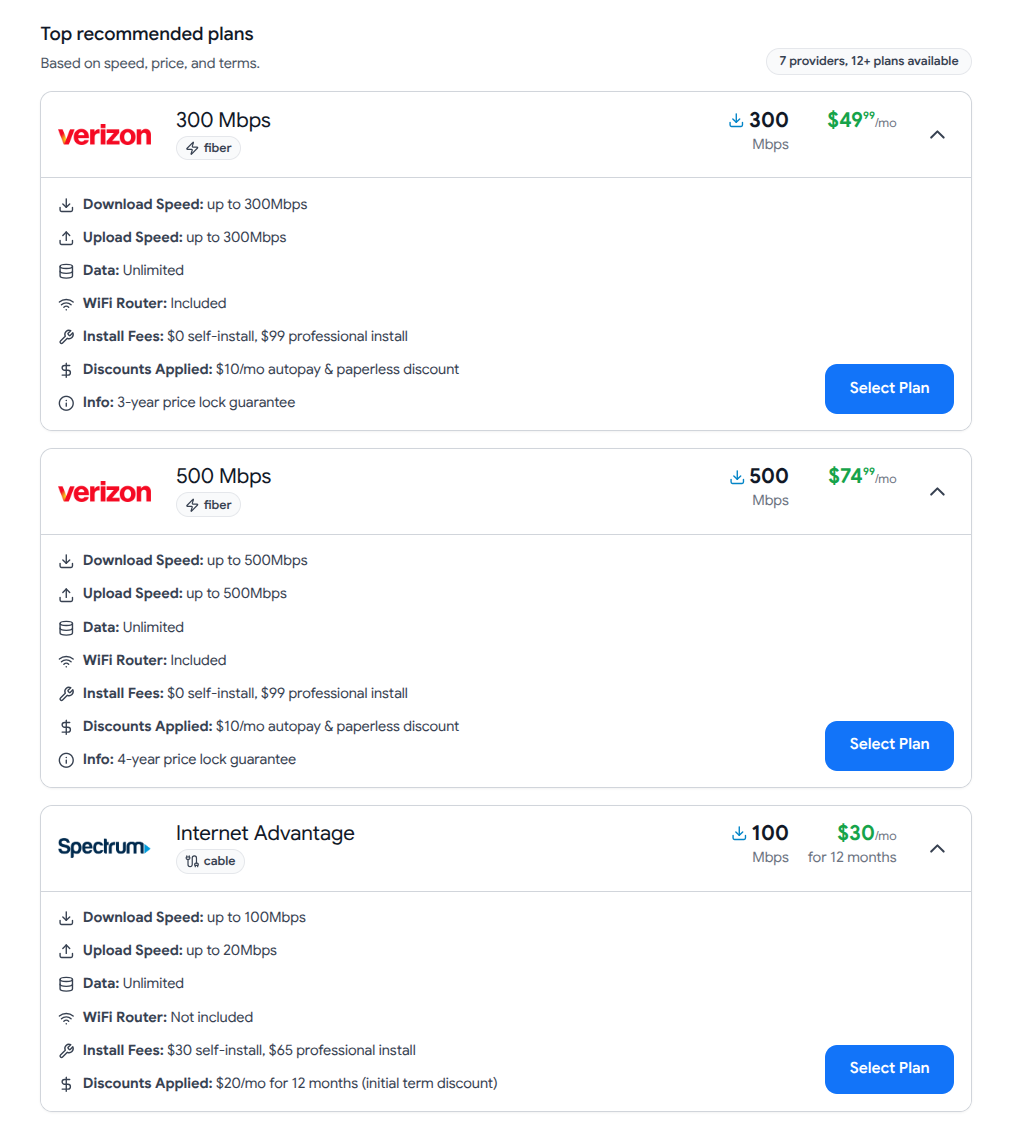
What is the Hum Widget?
The Hum widget is a fully-featured, embeddable component that enables your users to:- Search for internet service by entering their address
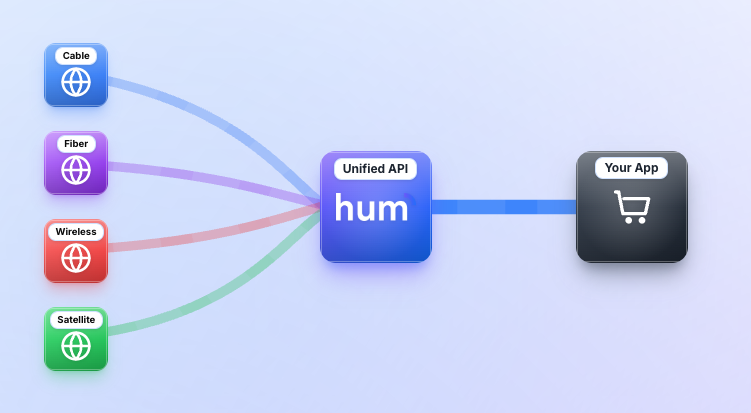
- Compare plans from 200+ internet service providers nationwide
- Filter options by technology, speed, price, and provider
- Complete checkout to order internet service directly
- Save plans for later comparison and review
- View provider details including contact information and coverage areas
The widget handles all the complexity of provider data, pricing, availability checking, and checkout flows—all you need to do is embed it.
Key Features
Real-Time Availability
Instant address validation and service availability from 200+ providers
Multiple Layouts
Choose from checkout, summary, or plans layouts to match your use case
Fully Responsive
Adapts seamlessly to desktop, tablet, and mobile devices
Customizable Branding
Configure colors and layout to match your brand identity
E-Commerce Ready
Complete shopping cart and checkout flow for participating providers
Event Notifications
Listen to order completion, plan saves, and other user actions
Architecture
The Hum widget is built as a React single-page application using client-side rendering. It’s designed to be:- Performant: Loads asynchronously without blocking page rendering
- Lightweight: Minimal impact on your page load times
- Secure: All API communication is encrypted and authenticated
- Reliable: Hosted on a global CDN with 99.9% uptime
The widget communicates with the Hum API backend to fetch real-time provider data, validate addresses, and process orders.
Layout Options
The widget supports three layout modes to suit different use cases and user experiences:- Checkout Layout
- Summary Layout
- Plans Layout
The checkout layout provides a full e-commerce experience with a shopping cart, allowing users to select plans, add-ons, and complete the ordering process.Best for:
- Users actively seeking new internet service
- Dedicated pages that support multi-step flows
- Conversion-focused implementations
- Real estate, mortgage, and relocation apps
- Interactive shopping cart
- Multiple provider selection
- Add-on services (TV, phone)
- Complete checkout flow
- Order confirmation

Integration Methods
Choose the integration method that best fits your technical stack and requirements:JavaScript Integration
Embed the widget using JavaScript and HTML. Ideal for websites where you control the codebase.Best for: Web applications, landing pages, React/Vue apps
WebView Integration
Load the widget via URL in a mobile WebView. Perfect for native and hybrid mobile apps.Best for: iOS, Android, React Native, Flutter apps
Both integration methods provide the same features and user experience—choose based on your technical environment.
Configuration Options
The Hum widget is highly configurable. All options are optional and have sensible defaults.Display & Layout
Controls the visual presentation of internet service results.Accepted Values:
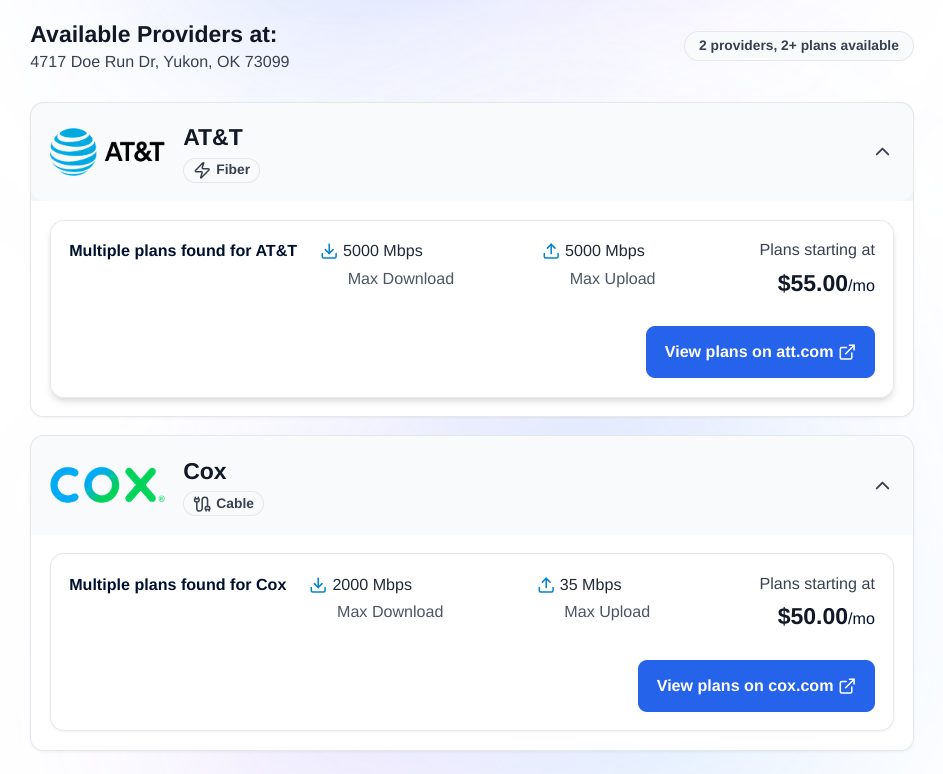
"summary"- Compact table format with affiliate links"checkout"- Full shopping cart and e-commerce experience (default)"plans"- Card layout with affiliate links
"checkout"Customizes the primary color for buttons and UI elements throughout the widget.Format: Hex color code (e.g.,
"#1274f9")Default: "#1274f9"The color will be automatically darkened by 10% for hover states to ensure consistent user experience.
Controls whether users can save and unsave internet plans for later comparison.Default:
falseWhen enabled:- Save/unsave button appears on plan cards
- Triggers
humPlanSavedandhumPlanUnsavedevents - Allows users to bookmark plans for future reference
Tracking & Analytics
Identifier for tracking attribution and analytics purposes. Associate widget sessions with specific marketing campaigns, traffic sources, or user segments.Default:
undefinedFiltering & Limiting
Restricts results to specific internet service providers using FCC provider IDs.Use cases:
- Partnership agreements
- White-label implementations
- Regional focus
Use the Provider ID Lookup endpoint to retrieve 200+ internet provider IDs programmatically.
Designates one or more providers to display more prominently as top plan recommendations using FCC provider IDs.Accepted Values: Single provider ID string or array of provider ID stringsImpact: Featured at the top of search results with visual prominence
Filters results to show only specific connection technology types.Valid options:
Fiber, Cable, Wireless, Satellite, DSL, OtherCombine with
limitProviders for precise control over displayed plans.Customer Data Pre-population
Pre-populates customer information in the shopping cart to streamline checkout.Available fields:
firstName- Customer’s first namelastName- Customer’s last nameemail- Customer’s email addressphoneNumber- Customer’s phone number
Address Data Format
The widget expects address data in a specific JSON format:Required Fields
Primary street address containing street number and name.
City name.
Two-letter US state code (e.g., “MI” for Michigan).
ZIP code in 5 or 9-digit format (12345 or 12345-6789).
Optional Fields
Secondary address information (apartment, suite, unit number).
Latitude coordinate for improved performance and reduced latency.
Longitude coordinate for improved performance and reduced latency.
Common Use Cases
Real Estate & Property Platforms
Real Estate & Property Platforms
Help homebuyers and renters understand internet options before making decisions.Implementation tips:
- Use summary layout for listing pages
- Pre-populate address from property data
- Track by property ID with
campaignId
Relocation & Moving Services
Relocation & Moving Services
Provide comprehensive internet service information as part of relocation assistance.Implementation tips:
- Use checkout layout for conversion
- Integrate with move-in date scheduling
- Pre-populate customer data from profiles
Financial Services & Mortgage
Financial Services & Mortgage
Assist mortgage applicants and homebuyers in planning their move.Implementation tips:
- Embed in post-approval flows
- Use property address from loan application
- Track by application ID
Property Management
Property Management
Help tenants find and set up internet service for their new homes.Implementation tips:
- Limit to preferred providers via partnership
- Use property’s address by default
- Brand with property management colors
Apartment & Home Listing Sites
Apartment & Home Listing Sites
Add value to listings by showing available internet services.Implementation tips:
- Use summary layout for compact display
- Cache results by address
- Display alongside other amenities
Getting Started
Ready to integrate the Hum widget? Choose your integration method:JavaScript Integration
Step-by-step guide for embedding the widget with JavaScript and HTML
WebView Integration
URL-based integration guide for mobile WebView applications
Widget Hooks
Learn how to listen for events and handle user actions
API Integration
Build custom integrations using the Hum API directly
Support
Get Support
Contact our team for API keys, integration assistance, and technical support